Tuesday, November 23, 2010

Super Easy Tube Scarf & Another Bag

Recently it was my bestie's birthday and I really wanted to make her something.  I remembered I had started a bag but never finished it.  So I pulled it out and decided it would be a great gift.    It's the same bag pattern that I used for my cousin's bag seen here.  I didn't add pockets to the inside of the bag but it has an invisible pocket on the outside of the bag.  It's just the right size for keys and lip gloss.


 It's a pretty big bag, so my friend can use it to grab some diapers and a few toys and head over for a play-date.  I think she liked it and it turns out that she was secretly hoping I would make a bag for her!

The next project I made for her was a tube or infinity scarf.  I've seen these types of scarves in T.V. and magazines and came up with the idea in my head on how to make one.
Do you want to make one?  They are SUPER easy to make.

I bought 2 yards of jersey knit material and some matching thread.  I cut 12 inches wide by 2 yards. (I might play around with width in the future and try some a little wider.)


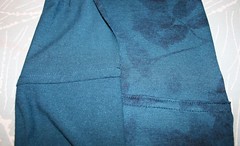
To make my seam I made a flat felled seam, like you would see on the side of jeans.  I thought this would look the most clean and lay the most flat.  Also, I didn't hem the long edges of the scarf because knit will not fray and I like the raw edge look of knit.   Place the cut ends together with right sides out.


*Make sure you have a needle that is for sewing knit material, they're usually called ball point.  Now sew a 5/8" seam.


Next, press the seam to one side and then cut the inside of the two seam flaps to 1/8", leaving the top flap 5/8".


 Fold the longer top flap over to encase the cut flap.  Pin the fold down and sew as close as you can to the folded edge.  I moved my needle to the right to help with accuracy. 


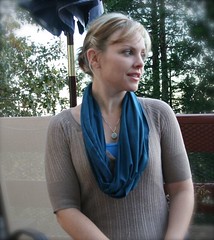
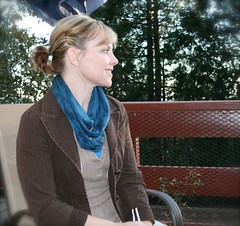
Here I am modeling the tube scarf.  It's fun to find different ways to wear it!
Your turn.  Make one, they are so easy and you could whip up a bunch in one day.  Send me an email with pic if you do!  Hey, these could be a great Christmas gift.... 

Sunday, October 31, 2010

Halloween 2010: Sock Monkey

This year I really wanted to make Avery's costume.  Rod came up with the idea of Avery being a Sock Monkey.  I loved the idea and together we went on a hunt for men's large wool socks.  I thought I could cut them up and use them to sew up her costume.  No luck.  We couldn't find a package of socks that were affordable.  There were single pairs running from $6 to $12 dollars!  Yikes.  So we went to the fabric store and found this wool suiting material with the perfect pattern.  Then I found a cream colored sweat shirt at the thrift store to use for the feet, hands and top of head.  For a pattern I just used a pair of Avery's feet pajamas.  I think it was a success.  Here she is:
Tail and Velcro closure.
Daddy and his Sock Monkey.
She liked waving and watching her hands move in the gloves.
HAPPY HALLOWEEN!

Tuesday, September 14, 2010

Fun Finds!

One fun activity I did over the summer was go to the Rose Bowl Flea Market.  It was great! If you go, plan to go early, have walking shoes and water.  I got there about 9am and didn't leave till almost 3pm.  I don't think I sat one time.  I was just walking and browsing.  They have everything and anything you can collect.  Sorry I didn't take pictures.  The Market has an entire area that is just for clothes.  I never even made it there.  It can be kinda overwhelming.  I was so excited when I came to a booth with vintage fabrics and notions.  I was at this booth for an hour or more.  It was so fun to browse all the fabrics.

Vintage fabric purchase

Pattern for Avery
Pattern for Avery


P
Pattern for me.  I thought this would be cute for work.


Cute old notions.  This was a fun purchase.


My next fun find was an old Singer sewing machine.  I purchased this machine for $15 from someone on Craigslist.

It needs some TLC to fix up the rusted parts.  I don't know the exact year of this machine but I think it's some where from the 20's to 40's.  I love it and it makes a great decoration in my sewing/guest room.


Recently at my local thrift shop I discovered a drawer where they keep patterns and fabric!  Wha hoo! The patterns are twenty five cents a piece.  Here are some early 70's patterns that I think are cute and could be made to look modern.  If I don't use them, I just love the history and look of them.


Love the hair on the last girl to the right.

 I also found some cute fabric with these patterns.  My total was eight dollars and some change.  That's my kind fabric and pattern shopping!  Now, I just need to find some time to make one of these lovely vintage patterns.

Friday, September 10, 2010

Report on Wardrobe Contest

Well, I think it's about time that I report on how I did on my work for the Wardrobe Contest.  We had such a good time enjoying our summer vacation that it was hard to complete all 10 items.  I was able to finish 3 1/2 items.  I was sad that I didn't meet my goal of being able to enter this contest.  Here are my items:

Top #1
Simplicity 2696
  This was a frustrating top but I like how it turned out and I wear it often.  (Blogged here.)


Bottom #1: Skirt

Simplicity 2413

Pattern Description: Misses' skirts, each in two lengths

Pattern Sizing: D5 4,5,8,10,12

Did it look like the photo/drawing on the pattern envelope once you were done sewing with it?
Pretty much, but I sized mine to fit on my lower waist. I think this was a wrong decision.

Were the instructions easy to follow? Yes, very clear and easy to follow.

What did you particularly like or dislike about the pattern? I really like having the pockets and they were easy to make. I also like the full skirt feel. It's fun to wear and makes me feel feminine.

Fabric Used: stretch sateen (love it!)

Pattern alterations or any design changes you made: As I was fitting as I sewed, I realized the waist was going to be too tight and I should have made a size bigger. I made some alterations and decided I would feel more comfortable all day at work if the skirt sat lower on my waist. After seeing the pictures of the finished skirt, I realize this was not a flattering decision. It makes me look like I either have no waist or a wide waist.

Would you sew it again? Would you recommend it to others? I will definitely sew this again and highly recommend this to others.

Conclusion: Cute skirt that was easy to make and will be a great staple in my wardrobe.  I plan to alter this skirt so it will sit higher on my waist to make it a bit more flattering.


Here I am looking like I have no waist.  Bad alteration decision, still need to fix this.

Top #2: 
Simplicity 2925
 I haven't written a review on PatternReview.com for this one yet.
Back view

Top is made from silk-like material and the belt and shoulder straps are silk.

 I was not happy with how this top turned out.  It looks like a silky paper bag with a belt.  I think I should have made the view with sleeves.  I think I hate those straps.  The material is really pretty and feels so nice.  I didn't put in the back zipper as the pattern recommends.  It makes it kinda tricky to put on but it works.  I just make sure to put makeup on after I put the top on.
This is how I wore it to a baby shower.  I think I wore a different black sweater that was shorter and 3/4 length sleeves.  I like this look for work.

Free Choice:  Dress
Butterick 5455
I haven't written a review on PatternReview.com for this one yet either. This is my almost 4th item.  This is a semi-fitted straight dress.  I really like how this has turned out so far.  It's made from a silk-like material and the contrast band was made with the same black sateen as the skirt above.  I still need to hem the bottom and hand sew the sleeves.  I had to do some alterations for small shoulders and let out the waist a bit.  I think I'm improving a tiny bit in mixing two sizes of patterns to get my fit (smaller on top and and bigger on the bottom.)  I know, I know, hand sewing=yuck.  I tried three times to figure out how to machine sew the arm holes with the lining, but it was impossible.  How do you turn it right side out afterward?  Impossible I say!  But since then, I have found tutorials on how to do it.  Aw well.  I'm not about to rip out seams for the 4th time.  I'll just hand sew.
I love the fit and the fact that it has pockets.  I'll model in it when I get the finishing touches done. Hmmm, where to wear this?  Anniversary coming in October.....


So, almost 4 items out of 10.  I guess it's not too shabby for a novice and mom of a 1 1/2 year-old.

Thursday, September 2, 2010

Summer Lovin'

It has been a wonderful summer!  It was the first summer where Rod and I had the same summer vacation time off,  now that we are working for the same school district.  We got house projects done, visited family several times and had some fun outings.

To start off our vacation,  on July 4th Avery decided to kiss the hardwood floor during a fall from her little rocking chair.  Her nose and mouth were bleeding and it was very scary.  She had a big cut inside her upper lip so we took her to the emergency.  The doctor said they don't usually stitch this area and it should heal fine on it's own.  Here she is looking like a fighter with her swollen lip.


Smiling for her popsicle.


Avery and I did a Mommy and Me swim class with my friend Allison and her son Luke.  It was fun watching Avery learn to splash and kick and I got really good at demonstrating blowing bubbles in the water.

Our bathing beauty.

 We took a trip to Mammoth Mountain with family and friends.  We did a little hiking and some fishing.

The Rounkes
Me and Allison
Rod and Drew carrying the precious cargo.
Rainbow Falls
Judy and Tim, so cute.
Ski slopes in the summer.
View from our condo.
Good times just hanging out at the condo.


Cousin Matt reading Avery a story before bed.
This was one of our fishing spots.  It was a fun and relaxing trip.

That's just half of our summer adventures.  More to come in the next post.